Move Microsoft Word Document To Mac
- Microsoft Word Document Online
- Google Docs
- Microsoft Word For Mac
- Move Microsoft Word Document To Mac Free
Migration Assistant copies all of your files to your new Mac so that you don't have to copy your files manually.
Jun 14, 2019 Why? Well, Word does not have a native option or feature that allows users to freely and easily move pages around in a Word document, at least not under normal circumstances. That’s not to say that it is impossible to move pages around in a Word document, however – it is certainly possible, and not too difficult either. Jun 28, 2011 Transfer files from MS Office on a Windows PC to a MAC. I would like to transfer files created on MS Office Home and Student created on a PC running Windows 7 to a new MAC with MS Office Home & Student 2011 already preinstalled on the MAC. Change the location of a table on a document page by copying or dragging. Skip to main content. Move or copy a table. Word for Office 365 Word 2019 Word 2016 Word 2013 Word. Print Layout view, rest the pointer on the table until the table move handle appears. Rest the pointer over the table move handle until the pointer becomes a four. Open XML Format. When you create a document or template in Word, Word automatically saves the document or template in the Open XML Format. This file format differs from the format used by Word 2004 for Mac or earlier and Word 2003 for Windows or earlier. Mar 09, 2019 The new updates are great for Office 2011, running faster etc, but once you update or restore from a backup or an old mac or install from the original disk again, you are locked into just one computer and that mac going forward. If you want to move it to another computer, you will have to activate it through Microsoft directly again with the.
Microsoft Word Document Online
- If your files are currently on a Windows PC, follow the PC migration steps instead.
- If your new Mac is using OS X Mountain Lion v10.8 or earlier, follow the Mountain Lion migration steps instead.
Check software, settings, and power
- Install all available Apple software updates on both Mac computers. Install any updates for your third-party apps as well.
- Make sure that your old Mac is using OS X Lion or later.
- Make sure that your old Mac has a computer name: Choose Apple menu > System Preferences, then click Sharing and check the Computer Name field.
- Connect both computers to AC power.
Connect the computers to each other
- If both computers are using macOS Sierra or later, just make sure that they're near each other and have Wi-Fi turned on. If either is using OS X El Capitan or earlier, connect them to the same network using Wi-Fi or Ethernet.
- Or connect them using target disk mode and the appropriate cable or adapter. Then start up your old computer in target disk mode.
- Or connect your new Mac to a Time Machine backup of your old Mac.
Use Migration Assistant
On your new Mac:
- Open Migration Assistant, which is in the Utilities folder of your Applications folder.
- Click Continue.
- When asked how you want to transfer your information, select the option to transfer from a Mac, Time Machine backup, or startup disk.
- Click Continue.
On your old Mac:
If you started your old Mac in target disk mode or are migrating from a Time Machine backup, skip these four steps.
- Open Migration Assistant.
- Click Continue.
- When asked how you want to transfer your information, select the option to transfer to another Mac.
- Click Continue.
On your new Mac:
Google Docs
- When asked to select a Mac, Time Machine backup, or other startup disk, click the appropriate icon.
- Click Continue. You might see a security code.
On your old Mac:
If you started your old Mac in target disk mode or are migrating from a Time Machine backup, skip these two steps.
- If you see a security code, make sure that it's the same code as on your new Mac.
- Click Continue.
On your new Mac:
- You should see a list of backups organized by date and time. Choose the backup that you want to use.
- Click Continue.
Continuing on your new Mac:
- Select the information to transfer.
- Click Continue to start the transfer. If you have a lot of content, the transfer might take several hours to finish.
Microsoft Word For Mac
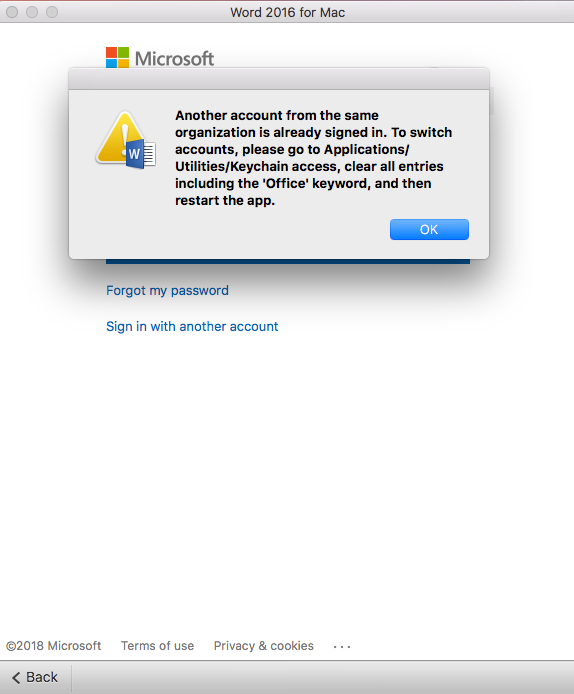 Follow the remaining prompts.Select the steps for the version of Office you want to install or reinstall. FirefoxIn the pop-up window, select Save File.Next, from the upper-right of the FireFox browser window, select the downloads arrow and then select SetupProdOffScrub.exe.Select the version you want to uninstall, and then select Next.Follow through the remaining screens and when prompted, restart your computer.After you restart your computer, the uninstall tool automatically re-opens to complete the final step of the uninstall process. Close the uninstall tool.
In the example above, John Appleseed is a macOS user account. If you transfer an account that has the same name as an account on your new Mac, you're asked to rename the old account or replace the one on your new Mac. If you rename, the old account appears as a separate user on your new Mac, with a separate home folder and login. If you replace, the old account overwrites the account on your new Mac, including everything in its home folder.
Move Microsoft Word Document To Mac Free
After Migration Assistant is done, log in to the migrated account on your new Mac to see its files. If you're not keeping your old Mac, learn what to do before you sell, give away, or trade in your old Mac.